 Ironing board is an integral attribute in an apartment and a house. Without it, it is impossible to quickly and comfortably wash washed and dried things. But in order to complete the work without problems, you must first get the board, put it in a convenient place, and then remove it. It causes discomfort, requires a place in the room. The latter is often not enough. To avoid this, they make a folding built-in ironing board (wall) in a convenient place for further operation.
How to make an integrated ironing board yourself
There are several mounting options for the ironing board. Before choosing a niche for installation, choose the type of product. Comfort in use also depends on this.
Kinds:
- From the closet. Use ready-made models. A good plus - there is no cost for additional shelves, partitions and other cabinet elements.
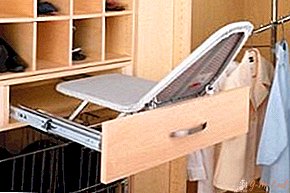
- Retractable system. It is used in kitchen sets, sliding wardrobes and simple dressers. The main elements are guides. The size of the board is equal to the size of the box. This parameter is increased by folding the headset in half. The advantage of the system is compactness.
- Hinged board in the wall. The structure also includes a frame built into the wall and a footrest. The size depends on the room and preferences. This is one of the popular mounting options.
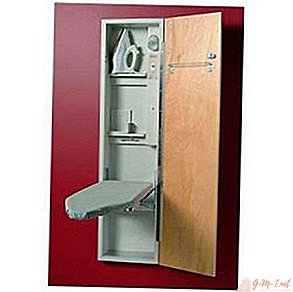

Important! The cabinet is resistant and comfortable furniture for this design. But before installation, they carefully inspect the wall to which the entire structure will be attached. If the back wall is in poor condition, a heavily loaded board may tear the wall and fall.
Necessary materials and tools
To make a folding ironing board from a wall, cabinet or other element (often used in the form of a mirror), not many elements are needed.
Materials:
- Plywood or other material for the entire frame, more than 12 mm thick.
- Material for tight fit, staples.
- Flange.
- Sawn chrome tubes.
- Washers for a joker pipe or bolts for upholstered furniture. The second option is better, because without manipulation it completely disappears in the frame.
- Guides.
- A bolt with a hat turned on a grinder or a long block for fastening on guides.
- Handles for guides.
- Trimmed bolt.
- The plate for which the lock lock will cling.
Of the tools you will need a screwdriver, mallet, grinder, hexagon, pencil, meter or ruler, square, stapler, scissors. Depending on the approach and the elements used, additional tools may be required.
Step-by-step instruction
Installation includes work with a frame and an ironing board. Depending on the type of construction, they begin by creating a niche.
Important! When installing in a wall, it is necessary to legally coordinate the work. This will protect against possible problems with regulatory authorities.
Stages:
- An ironing board is cut, about 125 mm long and about 40 mm wide. Resize based on the premises and your own preferences.
- Create a frame for installation. Depth is calculated from the size of the chrome pipe, the thickness of the back wall, protruding elements of the flange.
- After creating the frame, install a jumper in the frame. It should rotate freely. To do this, it is best to use special bolts for upholstered furniture. They do not perform. The size of the holes is 10 mm. They are drilled at a distance of 10 mm from the edge, 15 mm in front and 110 mm from the bottom. If bolts with small protrusions cut the jumper about 6 mm less than the inside width of the frame.
- Fasten the jumper to the guides. For fasteners, two methods are used: a bolt with a turned head or a long bar. The second option is easier. A block with a length of about 100 mm is quickly driven in with a mallet. To do this, put the tube on the wood, hit on the other side. Make a hole in the center of the clogged bar. Attach to the screws on the inside of the guides.
- On the other hand, set the handle. They are necessary to remove the fixation. Trim the bolt for durable fasteners.
- Bend the corner on the guides where the handle is located, 45 degrees inward. This must be done before fixing to the structure.
- Bend the plate 45 degrees inward and attach it to the frame.
- They fix exactly in the middle the fasteners of the central tube. Immediately insert the tube, tighten the screw to fix it.
- Assemble the remaining tube structure.
- In order for the ironing board to be parallel to the floor, the guides must be correctly fixed. Take into account the thickness of the board. Therefore, it is necessary to make the tube hang in air 16 mm from the wall (approximately). Make notes.
- Draw out guides. Mounted on self-tapping screws.
- Check the angle of the resulting structure in the extended state. The angle with the table should be equal to 90 degrees. Also checked in an upright position.
- For security, you can install latches.
- Then set the sawn board. Sheathed with material using a stapler and staples.

The final step is the installation of a door or sash. Use several options: hinged doors or a retractable system. The latter option is considered the most compact, because it saves space and does not interfere with work. It depends on the location of the ironing board. As decorative elements, paintings, mirrors, lining at the edges and other options are used.
This self-made design does not require much time and money. It takes up little space, outwardly fits into the interior, and is convenient to use.
Leave Your Comment