 Ordinary cabinet furniture occupies from 40 to 60% of the total usable area of an apartment. Perhaps this served as the basis for the wide popularity of wardrobes as wardrobes. In addition to saving space, they provide the homeowner with additional volume; the useful volume of such a cabinet is two and a half times larger than that of an ordinary cabinet with hinged doors. This is achieved primarily due to the fact that the design of this product used swing doors that do not require additional free space and, accordingly, save the presence of free space in the room.
Making a wardrobe do-it-yourself
We offer to make this furniture with our own hands. But first, it’s worth getting acquainted with the preparatory work.
What tools will be needed
For the independent manufacture of furniture of this type, the following tool will be required:
- electronic or mechanical roulette;
- building level;
- electric jigsaw;
- screwdriver;
- electric drill;
- wood drill;
- hammer.

In addition to the listed tool, you will need to purchase:
- self-tapping screws complete with dowels;

- guides to ensure the movement of compartment doors;
- construction (double-sided tape);
- napkins impregnated with alcohol, they will be required for degreasing the surface of the parts;
- accessories for guides;
- corners, bar holders;
- racks - hangers.

How to choose a good material for the manufacture of wardrobes
 Most often, for independent manufacture of furniture, including compartments, such material as chipboard is used. This material is distinguished by low cost, sufficient strength and ease of processing. Chipboard manufacturers offer a wide selection of colors, patterns, etc. This allows you to implement the most interesting design solutions. But unlike many other materials, chipboard is difficult to fine-tune. This serves as the reason that chipboards are more often used for the manufacture of relatively simple structures.
For this reason, mainly simple structures are made from chipboard or chipboard.
Important! The best solution is to use a moisture-resistant chipboard coated with a laminate.
What knowledge is needed to make a wardrobe
To perform work on the independent manufacture of furniture of this type, you need to know:
- how to draw a sketch and, of course, understand how to correctly measure the room in which it will be installed;
- in addition, knowledge in terms of wood processing and skills in installing components in their places are needed;
- Of course, a person who decides to make a compartment on his own must be able to work with an electric tool.
Sliding wardrobe options
There are two large groups of products, built-in and cabinet. Built-in are installed between the walls, cabinet, installed in a pre-prepared place.


In practice, coupe models are most often used:
- two-door;
- three-door;
- angular.
When choosing a model, it is advisable to be guided by the tasks that must be solved. If it will be used to store outerwear, the use of one model will be required, if for the storage of bed linen, then a different design will be required.
How to build a do-it-yourself wardrobe drawing
After preparing the tools, choosing the material for manufacturing and the type of cabinet, it is necessary to build a drawing. Without this component, building good furniture will not work.
We measure the space for the cabinet
Measuring the place for this product is an extremely serious operation. Typically, this type of furniture has right angles. Except for those cases when the room has oblique or curved elements.

IMPORTANT! INCORRECTLY CARRIED OUT MEASUREMENTS WILL RESULT IN THE FURNITURE WILL BE IMPOSSIBLE TO INSTALL IN ITS PLACE.
The most difficult place in the room, it can be considered that the most difficult element for a normal installation will be niches. In addition to the distance between the walls, it is necessary to make sure that the walls are installed strictly perpendicular to the floor and ceiling. Even a slight curvature of the walls can lead to difficulties during the assembly and installation of furniture.
The room measurement algorithm looks something like this:
- the first measurement between the walls is carried out either by floor level or by ceiling level;
- then, with a certain step, perform similar measurements along the entire height of the wall;
- according to the same scheme, measurements are made between the floor and the ceiling;
- the results are recorded on paper in the form of a sketch.

To sketch, you can use computer-aided design programs, such as AutoCAD or Compass 3D. Using these software systems allows you to create three-dimensional models of both the room and the future cabinet. Such models will serve as the basis for creating working drawings of parts for future furniture.
Important! Properly performed measurement ensures that the assembly of the cabinet will be performed with minimal time and money.
Making a drawing on paper
As already noted, the basis for the development of sketches and drawings will be the obtained dimensions of the room in which the product will be installed. When making drawings, you can be guided by the following parameters:

- the maximum height is equal to the height of the room where it will be installed;
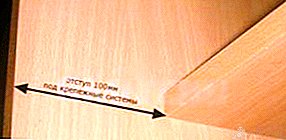
- the depth consists of two sizes - the depth of the shelves, it is about 500-700 mm and the distance that will be required to install the guides along which the door will move.
How to make a drawing of a built-in wardrobe
To develop a drawing of the future cabinet you will need to know:
- Cabinet dimensions.
- The dimensions of its individual parts.
- The materials from which individual parts will be made, such as sidewalls.
- How the cabinet will look from the inside, that is, or by hand, it will be necessary to break down the cabinet into sections located both horizontally and vertically. Determine their sizes.

Before developing the working documentation, you need to know where the necessary fittings will be installed. Mark the ends to be hemmed. Using computer programs will allow you to print the details and assembly order, but to develop assembly technology, you will need to use special routines. By the way, there are programs that specialize in the design of such products.
How to make do-it-yourself wardrobe doors
Before you begin the manufacture of cabinet doors - compartments, you must select even sheets of material that you plan to send to the door. To check the sheet plane, you can use the building level. This is necessary in order to avoid distortions during operation of the finished product. After the sheet is picked up, it will be necessary to close its bare ends. This will prevent the penetration of moisture contained in the air inside the plate and its swelling. After performing this operation, wheels are installed on the door with which it will move along the guides.

The door for the cabinet consists of:
- Sheet - this can be a chipboard or glass sheet.
- Guides made of metal. They must be installed on the door leaf before assembling the closet.
How to make a wardrobe in the bedroom yourself: a step-by-step guide
Before assembling the cabinet, some work will be required.:
- It is necessary to prepare a place for installation of the structure, it is quite possible that you will have to align the walls, that is, to ensure their verticality. It is possible that you will have to level both the floor and the ceiling.
- Prepare material, fittings and other accessories.
We make individual parts
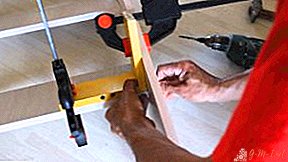
 Guided by the drawings obtained earlier, it is necessary to make body parts. You can make them yourself, for this you will need an electric saw or a jigsaw, but the best option would be to order finished parts in a specialized production. This can guarantee the quality of the cutting of the sheet, in contrast to manual processing. By the way, in the same place, as a rule, you can order and finish the ends of the sheet.
Sliding wardrobe assembly diagram

As a rule, companies engaged in the manufacture of sliding wardrobes and engaged in their installation in place. In this case, the consumer only remains to observe the assembly of the product and control the quality of the work performed. If the owner has purchased a finished cabinet, then, as a rule, detailed instructions for assembling the finished product are attached to the product and you only need to strictly follow its instructions. Thus, a high-quality design will be obtained that will last for many years.
Making a built-in wardrobe at home: a step-by-step guide
 To assemble the product, it makes sense to make templates that will ensure compliance with the angular dimensions of the structure.
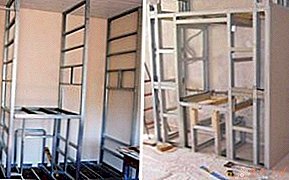 Cabinet assembly start by making the bottom. To increase the reliability of the structure after assembly on the basis of working drawings, it is advisable to fix the bottom to the floor. Anchor bolts can be used for this.
- During the following operations assemble the frame, at the same time establish shelves. They bind together the side sheets, thus ensuring the rigidity of the cabinet as a whole. If you are going to build a closet, the side walls make sense, attach them to the walls.
- After assembling the frame, it is necessary to check the angles between the walls and the shelves. They must be strictly equal to 90 degrees. Otherwise, the product will skew, and the door will jam when moving along the installed guides. As a result, you will have to repair the cabinet, and this is a rather expensive affair. That is, when working, you need to use a measuring tool that allows you to control the angles.
 Cabinet assembly start by making the bottom. To increase the reliability of the structure after assembly on the basis of working drawings, it is advisable to fix the bottom to the floor. Anchor bolts can be used for this.
All selected fittings can be installed already on the assembled cabinet. To install it, you must be guided by the requirements of the assembly instructions, they are supplied with accessories.
Leave Your Comment