Of course, for each family, the presence of this unit is necessary. However, not everyone can afford to purchase through a purchase because of the relatively high prices. Therefore, a great option is to create a do-it-yourself floorboard. This does not take much time and does not cost a lot of money. The article will describe in detail the stages of the entire process in detail. There are many varieties of the product: temporary design, folding, classic and so on. It already depends on the imagination of the future user.
What is required
 To get started, you need to decide on the tools you need. These include:
- piece of furniture board
- two bars with sizes 3, 5 * 4 * 30
- three pieces under 3, 5 * 4 * 110
- jigsaw or milling machine
- measuring tape
- drill and drill 8 mm
- bolts
- marker so that you can make marks
- scissors
- stapler
- upholstery panel pattern
- the cloth
Sequence
Now that all the materials have been prepared, you can proceed to the most important stage - the work itself.
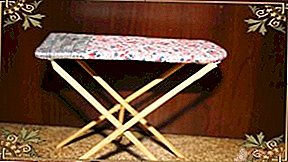
- The first step is to decide for yourself what the scale of the object will be. Typically, indicators range from 125 * 35 centimeters (length * width, respectively).
- Measure and transfer measurements to the furniture board itself.
- Prepare the bars, the dimensions of which are indicated in the above paragraph of the article.
- Next, cut the parts.
- Take a bar and measure 52 cm from one end and 58 cm from the other side.
- Drill a hole at the marked points.
- With other lumber it is enough to do such fraud.
- The longest of them should be sampled. To do this, you will need a test drill. Thanks to this, nothing will interfere with ironing.
- The remaining product must be combined, and the middle of them rotated 180 degrees.
 Organize a small gap, the diameter of which will be 8 mm, having previously retreated from the border by three cm.
- From other edges, leave a distance equal to two cm and make a selection from one.
- Use long bolts to attach long logs to short ones.
- From now on, your tabletop support is ready. It remains only to fix them. To do this, leave a space of about 18 centimeters from the border of the segment.
- If you cut a small depression at the other end of the element, then there will be the opportunity to attach a leg. It is convenient when folding the ironing board.
- In production, it makes sense to pay attention to the upholstery of accessories. It is also easy to fix. It is only advisable to take into account the parameters of the countertop. Next, mark the sketch with a marker and cut out according to the intended traces.
- Wrap the finished installation in the fabric and fasten the structure with a stapler.
 Organize a small gap, the diameter of which will be 8 mm, having previously retreated from the border by three cm.
There are times when there is no time to tinker with such inventions, and the presence of floorboards is mandatory. This problem can be solved by a temporary option. To do is as easy as shelling pears. And if you are also the owner of a wide stool, then you are lucky. It is only necessary to assemble a special cover, which will consist of three layers: a blanket, aluminum foil, cotton fabric.
IMPORTANT! The second of these materials should be mounted with the shiny side up. When you have collected all the essential things, you need to connect them with each other. This is done with a needle and thread.
In addition, you can use a stapler for fixing. In any event outcome, you end up with compact and easy to use. And thanks to the three-layer product, the surface of the chair itself will not be exposed to high temperature, so that safety is guaranteed.
Homemade Board Benefits

As practice proves: since people thought of an independent invention, then this definitely has its merits. So here are some of them:
- You yourself can adjust the length, width, height of the product. Make the ironing board exactly for you the dimensions of the device.
- Of course, one of the reasons for the thought of manufacturing is cost. The budget of many people can allow for the installation. firstly, the components from which it is built are affordable. And secondly, some of them may already be in the owner’s house.
- The user himself can verify the reliability and stability of the structure.
- There is no limit to imagination. The work can be done as a person himself wishes: to cut upholstery to your taste and color, from any kind of knitwear.
- Easy to use. There are no heaped up functions which would complicate process. On the contrary, the “folding - folding” mechanism is more convenient and does not spend much time.
- The ability to decide for yourself: attach the unit to one place, so that each time it does not rearrange, or not.
Leave Your Comment