 The pantry is designed to store things. It is very important to properly organize the space in a small room so that it is convenient and practical. Shelves in the pantry or cellar are the best option. With independent production, you can choose the material and design of the structure in the pantry with your own hands, and divide the space according to your own preferences.
Shelf space mounted in the pantry will help to compactly place all the necessary things. Sophisticated storage systems will clean up and save space.
Other benefits include:
- storage of things for various purposes with the help of hinged structures;
- ordered space will reduce search time;
- lack of need to establish bulky furniture;
- the ability to remove unwanted items from strangers;
- You can make shelves for the room yourself.
 The design and material should be selected depending on the purpose. Canned foods require massive products that can withstand heavy loads. Fragile products need closed spaces on the upper tiers.
Important. With proper space planning, it is possible to combine different models in one room.
The main varieties:
- The classic version of the hinged structures is suitable for household chemicals, appliances and other products.
- For heavy items, you should choose products with additional fasteners, a stand and stiffeners.
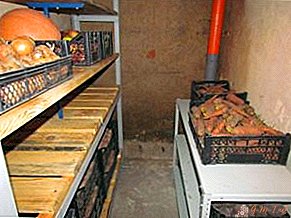
- Shelves with natural ventilation are used for food and outerwear.
- Small and valuable objects are recommended to be placed in a box, on a surface with sides and glass.
- The design with a rotating mechanism can be used on shelves for the convenience of finding the desired item.
Having decided on the type of shelves, you need to choose the material. The most common option is a tree. The structural strength is ensured by such species as spruce, larch, oak. Particleboard, MDF or plywood is also suitable for manufacturing. This option will cost less than natural materials. Eco-friendly wooden blanks are easy to maintain and install. Old furniture can be dismantled into planks and used to equip a storage room or in a cellar.
Attention. Depending on the planned load, choose a different surface width. Deformation and damage with proper design is minimized.
Metal structures are a reliable option, but prone to metal corrosion and are heavy. For such shelves and racks, additional fasteners must be provided in advance. In rooms with high humidity, it is recommended to cover metal products with a special protective layer. At home, whole metal products are not advisable to use.
Designs made of polymer plastic are an economical analogue of wooden furniture. During a long process of operation, wood material may lose its original appearance. Drywall products are not reliable, but their use is possible for small structures. There are also shelves made of combined materials. For example, wooden products with iron inserts or stiffeners. For placement of preservation and heavy objects, it is necessary to choose a material with a thickness of at least 30 mm.
 Space planning and layout is an important step. In a small space, it is important to use the entire space, but at the same time, leave space for ease of movement. The pantry should be a convenient and functional room for all family members.
Placement options:
- the installation of massive racks on the sides of the pantry is ideal for narrow rooms;
- a wall with a door or window is suitable for small structures, and other storage systems are placed on the opposite side;
- a large room provides for the installation of shelves, as well as shelving around the perimeter or in rows;
- mezzanine structures with swing doors can be successfully placed on the upper level of the pantry;
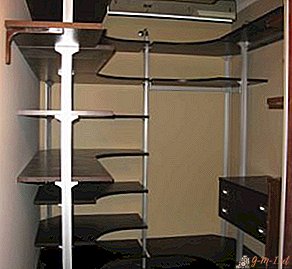
- corner placement is suitable for small rooms, as will save space.
During the planning period, it is necessary to take into account the dimensions of things, the dimensions of the shelves and the distance between the separate structures. Free access should be provided to the shelf on any tier. In this case, the order will be easily observed throughout the entire operation period.
Fundamental rules:
- Heavy items must be placed from below on the floor or in specially designated niches.
- Shelves fixed at a height of 50 cm are required to be made with the widest designs.
- At eye level, it is recommended to place objects that are most often used in everyday life.
- Storage systems at the upper level with a depth of not more than 40 cm, should be used for small items.
- The load on the structure should be taken into account, as safety and durability depend on this parameter.
 Before proceeding with self-assembly, it is necessary to prepare tools and additional devices. In the case when ready-made shelves are available, you will need to assemble only the installation kit. It is not necessary to purchase a power tool, but it will significantly reduce installation time.
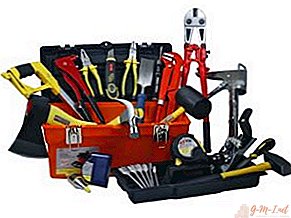
Required Inventory:
- drill or punch for drilling holes;
- special brackets and fasteners;
- a screwdriver is used to fix the fasteners;
- wooden wedges and wood glue for reliability;
- roulette, building level are needed for accuracy;
- a hacksaw for wood is useful in the preparation process;
- a marker or pencil is necessary for marking the room;
- sandpaper is used to process products;
- paintwork will give a complete look.
Depending on the design and placement option, accessories, pipes, bars and decorative elements are purchased.
Additional Information. The room must be prepared and cleaned before installation. It is advisable to treat the walls of the fungus.
Lighting must be provided before installation. The presence of ventilation holes will ensure air circulation. Indoor ventilation is very important. To make the pantry visually seem larger, you can use the light colors of the walls and mirrors in the empty areas of the room.
 The preparatory phase consists in planning and preliminary calculations. For high-quality installation, you should follow the sequence of actions. Only in this case, you get a reliable and safe design.
Work procedure:
- The marking on the walls always starts from the lower tier. To do this, you need a pencil, level and tape measure. Only perfectly even shelves will look neat.
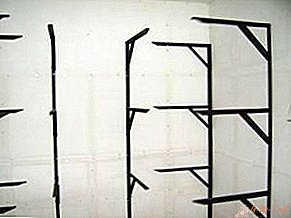
- In the necessary places, holes should be made using a hammer drill, and the brackets should be fixed.
- If a metal frame is provided, then it must be reliably fixed at this stage. Fixing elements is important from the corner of the room. The far part is checked with a plumb line.
- Next, you need to cut the sheet material with a jigsaw according to preliminary dimensions. The stage is appropriate when ready-made shelves are missing.
- Boards give a neat appearance with sandpaper, paint and varnish. The product must be allowed to dry.
- The next step is to assemble the entire structure, as well as fix the shelves with a screwdriver and fasteners. Hinged shelves should rest on top of the brackets.
- To strengthen the structure, pipes and stiffeners are used. The supports are cut with a hacksaw for metal and fixed between the shelves. The placement of the pipe can be strictly in the middle and side.
- You can install spotlights in a shelf space. This step is optional, but is used for convenience.
- The final step is to clean the room from debris and dust, as well as thorough ventilation.
In the presence of several tiers, it is required to choose metal fasteners that are able to withstand heavy loads. Shelves in drywall walls will be held securely with anchors.
 Key helpful tips:
- As a frame for shelves, you can use profiles designed for drywall construction. The option is only suitable if small loads are planned.
- To save money, you can purchase large sheets of the right material. Cutting with a power tool, painting and processing the edges will need to be on their own.
- If you plan to use shelves made of plywood, then fastenings on the ends will not be enough. Depending on the length of the structure, additional fixation is used.
- It is recommended that heavy racks be fixed to the wall in order to avoid the fall of the structure with all its contents.
- Installation must be carried out using the building level, as in the photo. Correctly fixed shelves will look aesthetically pleasing and will last a long time.
Shelves in the pantry, made independently, will allow you to compactly place all the necessary items and save time when finding the right thing. A properly organized storage system will make a small room convenient and functional. The reliability of the design depends on the choice of materials and placement options. At installation it is also necessary to consider features and rules of fastening of shelves.
Leave Your Comment