 Speaking about a style like Provence, we must first say that the name of the style comes from the name of the province located in the southern part of France. This province is known for its abundance of heat and sun, beautiful views of the sea. All these things fill this style. It will be appropriate not only in a house outside the city, but also in an ordinary high-rise building. Something this style has something in common with country, but much more sophisticated.
Distinctive features of the Provence style
Just one glance is enough to throw on the room, to notice some details to understand that the room is made in the style of Provence. The first thing that catches your eye is the abundance of light colors: white, cream, the color of blue. The furniture is executed in an archaic style and only from natural materials, nothing artificial.

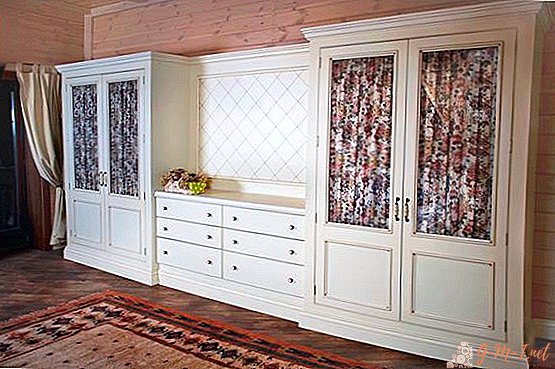
The ceiling is replaced by beams of light tones, the floors are covered with natural material. This is a tree or stone. The complete absence of futuristic notes, we are plunging into the past. One gets the impression that all the furniture was inherited. Imagining such a room in your imagination, you involuntarily begin to think of the closet as an integral element. If the room has an exquisite closet with two wings, which, as if setting a solo note to the entire room, we can safely say that this is Provence.
Materials and Tools
 So. We made a decision to create a cabinet with our own hands, we take Provence for the style basis. What distinctive features should he have?
- First of all, these are of course carved elements. Not at all the whole cabinet should be carved, it is enough to have only some details, for example, legs, handles.
- In this style, stucco elements are acceptable.
- The ornament will look good.
- It is important to age the furniture. Abrasions should clearly be evident.
- Massive elements also organically fit into the Provence style.
It’s not at all difficult to buy furniture created in antiquity and artificially aged in the store. However, you can transform the furniture that is already in the house. After all, it is so pathetic to throw it away.
IMPORTANT! Pre-processing requires wooden furniture.
For work, we need sandpaper, with which you need to remove old varnish or paint from the surface of the wood. The treated surface will need to be degreased. In stores, today, there is a huge number of all kinds of varnishes for tinting, which reduces the task of selecting colors to a minimum. The colors of mountain ash, apple or oak are perfect for our cabinet. Such aging takes very little time, if work is carried out in a well-ventilated area, then the varnish will dry in a few hours.
Further staining of furniture is also not the most difficult procedure, only the caller will need to be kneaded in advance. It should be enough for all external surfaces that are planned to be painted. After all, if there is not enough paint, picking up the exact same tone again will be very problematic. Decoupage is quite suitable as a decor.
We assemble the cabinet - instructions
 Young families are now in very difficult conditions. In addition to the psychological problems that arise in every newly formed family, the young have to solve the issues of their family "nest". Often, material difficulties are also imposed here, associated with a lack of finance for the purchase of new furniture. Yes, and the small size of the living area, require ahead of time to plan the arrangement of all interior items.
It is possible to solve this problem if you assemble the cabinet yourself. Thus, you can get a place, suitable parameters for storing various things.
If you carefully and in advance prepare for work, assembling the cabinet will not be a big effort. Special education and skills are not required.
To simplify further work, it is necessary to plan your activities in several stages.
- At the first stage, it is necessary to draw a diagram of the future cabinet.
- The main stage is the procurement of working tools.
- Next, we buy the parts we need.
- The crown of all creativity will be the assembly of the entire structure.
What is required
 Electric drill. Who knows where and what kind of holes you need to drill, and it’s more convenient to screw the screws in manually.
- Hammer. Naturally, to hammer in nails or dowels.
- Roulette. Nowhere without accurate measurements.
- Level.
- Joiner pencil. Marking is easier to do directly on the workpieces.
- Glue.
- Hacksaw for processing wooden blanks.
- A large number of screws.
 Electric drill. Who knows where and what kind of holes you need to drill, and it’s more convenient to screw the screws in manually.
The first step is to evaluate the quality of all the details of our future design. We make sure that there are no cracks, swellings, chips. The surface of all elements must be perfect. We transport individual elements in compliance with safety regulations. All parts must be firmly fixed in the vehicle.
Before starting work, you need to prepare a drawing of the future cabinet, and at the same time choose its future location. In this process, we need to build on personal preferences and on the space that we have. Most often, cabinets are located in pantries, in the corners of rooms or near walls.
Drawing and materials
 Having decided on the place where the cabinet will be located, you can proceed to the drawing. The drawing should reflect in detail all the elements of the cabinet, their location and dimensions. A drawing can be drawn by hand, on an ordinary sheet of paper, or you can use the services of specialized computer programs.
For the manufacture of cabinet shelves - sheets of chipboard are suitable. As fasteners for them, corners are used, which are fixed with self-tapping screws.
IMPORTANT! Before you begin, you need to prepare all the necessary materials. The edges of the elements can be processed at the place of purchase.
The main task is to accurately calculate the required number of elements and their sizes. If the drawing was originally made with errors, then most likely you will not have enough parts or materials and you will have to purchase them separately.
Leave Your Comment